1.9. TPYBoard v10x 模拟红绿灯教程
1.9.1. 实验目的
- 学习在PC机系统中扩展简单I/O 接口的方法
- 进一步学习编制数据输出程序的设计方法
- 学习模拟交通灯控制的方法
1.9.2. 所需器件
- 1位共阴红色LED数码管(SM42056) 1个
- TPYBoard v10X开发板 1块
- 红、绿、黄LED灯 各1个
- micro USB数据线 1条
- 220欧直插电阻 1个
- 杜邦线 若干
- 面包板 1块
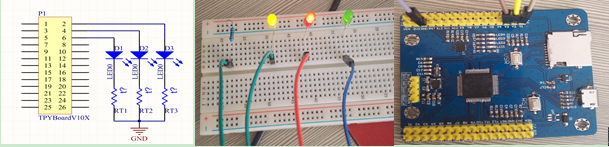
1.9.3. 点亮LED灯
- 1.将三个LED灯插在面包板上,LED负极插入面包板的负极(横向插孔),正极插入面包板的纵向插孔。
- 2.将222欧电阻插入面包板的负极上(横向插孔)和纵向插孔中,将LED灯的正极分别与TPYBoard v10x的引脚连接。
- 3.将红、黄、绿3个LED灯的正极依次通过杜邦线连接到TPYBoard v10x的Y1,、Y2、Y3的引脚上, 然后将电阻纵向插孔用杜邦线接到TPYBoard v10x的GND引脚。
- 4.在main.py文件中将Y1、Y2、Y3引脚的电平拉高,即可看到三个灯同时亮起来。
main.py 内容如下:
# main.py -- put your code here!
import pyb
led1 = pyb.Pin("Y1",pyb.Pin.OUT_PP)
led2 = pyb.Pin("Y2",pyb.Pin.OUT_PP)
led3 = pyb.Pin("Y3",pyb.Pin.OUT_PP)
While True:
    led1.value(1)
    led2.value(1)
    led3.value(1)
效果如图:
1.9.4. 点亮数码管
SM42056是0.56英寸一位共阴/红色LED数码管,共10个引脚。
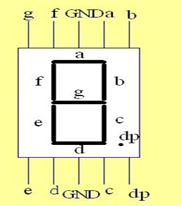
当小数点在你的右下角时,上面一排5个引脚,从左至右依次为g,f,GND,a,b,下面一排五个引脚,从左至右依次为 e,d,GND,c,dp。 如果我们想让数码管显示数字8的话,需要将a,b,c,d,e,f,g所连接的TPYBoard v10x的引脚拉高,把GND与TPYBoard v10x的GND引脚接起来就可以了。
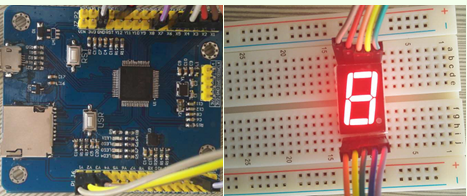
效果图:
1.9.5. 模拟红绿灯
我们按照上面的步骤做完以后,然后通过准备的数据线给TPYBoard v10x通电。
- main.py 内容如下::
# main.py – put your code here! import pyb led1 = pyb.Pin(“Y1”,pyb.Pin.OUT_PP) led2 = pyb.Pin(“Y2”,pyb.Pin.OUT_PP) led3 = pyb.Pin(“Y3”,pyb.Pin.OUT_PP) x1 = pyb.Pin(“X1”,pyb.Pin.OUT_PP) x2 = pyb.Pin(“X2”,pyb.Pin.OUT_PP) x3 = pyb.Pin(“X3”,pyb.Pin.OUT_PP) x4 = pyb.Pin(“X4”,pyb.Pin.OUT_PP) x5 = pyb.Pin(“X5”,pyb.Pin.OUT_PP) x6 = pyb.Pin(“X6”,pyb.Pin.OUT_PP) x8 = pyb.Pin(“X8”,pyb.Pin.OUT_PP) def six():
x1.value(1) x2.value(1) x3.value(1) x5.value(1) x6.value(1) x8.value(1) pyb.delay(1000) x1.value(0) x2.value(0) x3.value(0) x6.value(0) x5.value(0) x8.value(0)
- def nine():
- x1.value(1) x2.value(1) x3.value(1) x4.value(1) x5.value(1) x8.value(1) pyb.delay(1000) x1.value(0) x2.value(0) x3.value(0) x4.value(0) x5.value(0) x8.value(0)
- def eight():
- x1.value(1) x2.value(1) x3.value(1) x4.value(1) x5.value(1) x6.value(1) x8.value(1) pyb.delay(1000) x1.value(0) x2.value(0) x3.value(0) x4.value(0) x5.value(0) x6.value(0) x8.value(0)
- def zero():
- x2.value(1) x3.value(1) x4.value(1) x5.value(1) x6.value(1) x8.value(1) pyb.delay(1000) x2.value(0) x3.value(0) x4.value(0) x5.value(0) x6.value(0) x8.value(0)
- def seven():
- x3.value(1) x4.value(1) x8.value(1) pyb.delay(1000) x3.value(0) x4.value(0) x8.value(0)
- def five():
- x1.value(1) x2.value(1) x3.value(1) x5.value(1) x8.value(1) pyb.delay(1000) x1.value(0) x2.value(0) x3.value(0) x5.value(0) x8.value(0)
- def four():
- x1.value(1) x2.value(1) x4.value(1) x8.value(1) pyb.delay(1000) x1.value(0) x2.value(0) x4.value(0) x8.value(0)
- def three():
- x1.value(1) x3.value(1) x4.value(1) x5.value(1) x8.value(1) pyb.delay(1000) x1.value(0) x4.value(0) x3.value(0) x5.value(0) x8.value(0)
- def two():
- x1.value(1) x3.value(1) x4.value(1) x5.value(1) x6.value(1) pyb.delay(1000) x1.value(0) x3.value(0) x4.value(0) x5.value(0) x6.value(0)
- def one():
- x2.value(1) x6.value(1) pyb.delay(1000) x2.value(0) x6.value(0)
- while True:
- led1.value(1) nine() eight() seven() six() five() four() three() two() one() zero() led1.value(0) led2.value(1) nine() eight() seven() six() five() four() three() two() one() zero() led2.value(0) led3.value(1) three() two() one() zero() led3.value(0)